Showing posts with label DIY. Show all posts

Friday, February 3, 2017

Today's Installation

Remember the throw swags of the 80's and 90's?  If you ever tried it, you quickly realized that you couldn't make one long piece of fabric dip and dive and swag and come out even like you wanted.  If you were successful it was because you used an entire box of pins, AND velcro, AND a glue gun AND there was a lot of swearing involved.
I learned quickly that you could fake the whole look, and actually improve it, if all the sides of the window were treated with separate pieces.  It is SO much easier to control this way!
Today we started with a blank window. We added a cordless honeycomb shade for light control and privacy.
Prepare yourself - the rest of the pictures are just about this dark.  I sent a phone in to do a camera's job!
Since this was a traditional living room, we went with a slightly more formal pole swag to mimic the style that looks like it's just been "thrown" over the rod. The three pieces we used were a rodpocket panel, a pole swag and a double cascade on a tack strip. We chose a wood rod so we could staple the swag and the cascade to it.
Wonder why it's asymmetric? It's because it's one of a pair!
And here's the look with the blind raised:
All this - and NO swearing!

Damask fabric by Duralee - #D161328 in Pearl
Drapery hardware from Graber with Urn finials.


Monday, December 12, 2016

How to Set a Festive Table

I was recently asked to decorate some holiday tables for an Open House at Picket Fence Homes in Leesburg, Virginia.
The first was a snowman-themed table for four starring a jolly fellow perched atop a bed of marshmallow snowballs.  Completing the scene were snowman mugs and whimsical paper placemats.
The "tablecloth" was actually a chalkboard paper runner with a message on the front written in chalkboard marker.
The second table was a romantic setting for two, decorated with an intimate New Years Eve in mind.
Gold chargers, glittery silver ferns, beaded gift boxes and martini glasses full of treats created a festive, sophisticated mood.
Inspirations, instead of names, were in the placecard holders.
And a little Picket Fence wine doesn't hurt, either!
Our last table had a natural, woodland theme and featured a tree branch suspended from the ceiling, resplendent with old fashioned tinsel. (Use your imagination - it IS a conference room, after all!)
A carved wood stag sits as centerpiece among white pine table runners and glittered pine cones and leaves.

Cranberry colored chargers and plates featuring birds complete the picture.

Here are my guidelines for Setting a Festive Table:

Theme - choose one, however subtle it may be
Layer - texture, color or pattern
Shine - add metallic accents for some shimmer
Surprise! - use an accessory in an unusual way (like the marshmallows)
Glow - soften the light with candles or a dimmer switch
Remember my mantra:  Pleasing, not Perfect!!

Many thanks to all the fun people at Picket Fence Homes - 212 S. King St., Leesburg VA 20175
They were expert hot chocolate makers and also provided the holiday recipe cards that we gave away.


Thursday, July 14, 2016

The Palladian Shelf - my new bff!

My new BFF is not very photogenic.  You will have to wait for the sequel to this story to see her real loveliness.
Have you ever had a Palladian window - a half circle over a rectangle - that needed covering? And then you realized that there was no piece of wood moulding to install the shade to?  Lots of newer Palladians have a mere piece of vinyl separating the top from the bottom.  If you have a window treatment that can't be installed into the sides of the window, you are in trouble.
This has happened to me before and it always seems to be in 2-story foyers or over bathtubs where the installation is more difficult to begin with.
Enter the Palladian shelf!
This beauty comes in several colors and stains or unfinished so you can customize the color yourself.
First you install this bracket horizontally on each side of your window where you want the shelf to go.
You can see where the shelf is notched to go around the bracket.  You just slide it on!
Side view of a shelf that has been slid on to the bracket.

And that's it. The shelf is extremely sturdy.  Now you can install the window treatment to the underside of the shelf.  In my case, I will be installing to both the underside AND the top. Stay tuned!
I think there could be plenty of other creative applications for this shelf.  Let me know what you think!
Shelf is from Graber.


Friday, September 25, 2015

Crochet (??!) Chairs

I saw this recently at design-confidential.com.
Pictures of crocheted chairs or "swivel thrones" by Olek as presented by Todd Merrill Studio.
Proving again that it's ALL art!
How do you create YOUR work of art?

Sunday, September 6, 2015

Curves

Nothing quite as anxiety producing as a window on a curved wall that needs to be dressed. Most people don't know that you can have a rod bent to match the wall. The results are spectacular!
The same can be done with a bay window. Not only rods that have rings, but also your basic traverse rod can be bent, and the draperies can be opened and closed!
An easy way to create such a rod on your own is to use a bendable "elbow" that attaches between two rods. That's what we did in this guest room.
I know you'd love to see those gigantic finials close up so here's a better look:
These gorgeous finials in a rose gold finish looked handmade and weighed a ton!

First two photos from Brimar.
Rose Gold finials and rods are from The Finial Company.

Monday, April 6, 2015

100 Windows - #93

Just your basic panels with a 6" border hem, which is the same fabric used in the valance. The valance is either a cornice or a flat valance mounted on a board.  The flat valance would be easier to mount into a bay window.  The draped cording would be interesting to add to the valance, especially since it is in a solid fabric. 
I really like the idea of framing a piece of wallpaper and hanging it like art, as shown here.

Sunday, April 5, 2015

Happy Easter 2015!

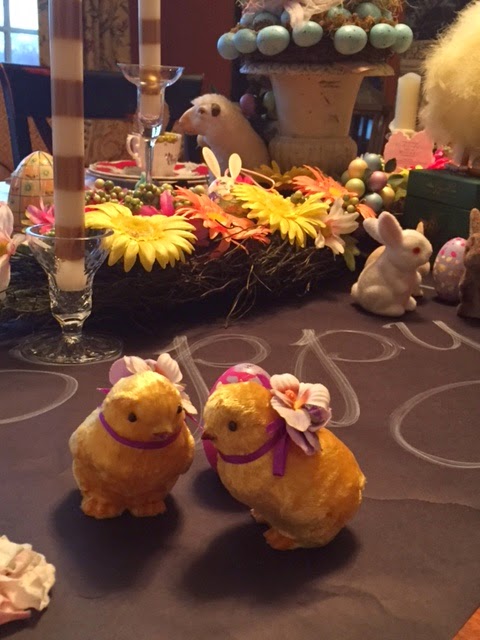
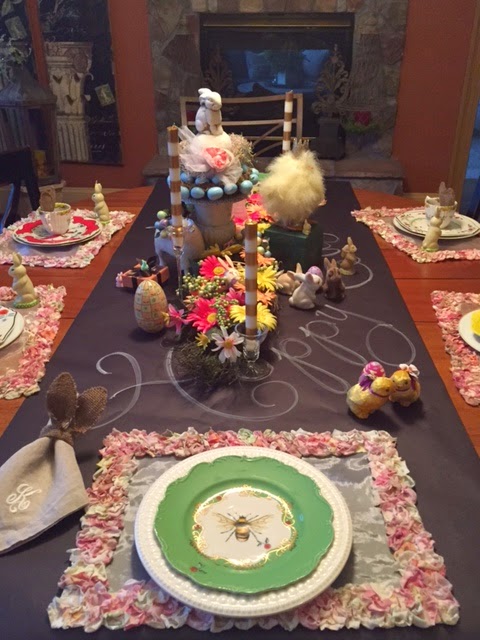
....and we will take a little break from window treatments to wish you a Happy Easter and show you how I decorate my table in my spare time..........
It's all so random! And some of these things I've had for 15 years - others are brand new.  Sources include Williams-Sonoma, Pier 1, Anthropologie and JoAnn's.

Monday, March 30, 2015

100 Windows - #90

Wow! We are in the home stretch.
Here's a DIY idea that could look oh-so-much-more professional if the workroom had done just one thing.  See if you can guess what it is.....
This attached valance uses so little fabric, it would be great if you have some leftovers or if you wanted to use that $200 per yard fabric. The use of 2 fabrics makes it look more custom but I just have to ask......Why wasn't it lined???  Was that what you guessed?
The curtain portion is supposed to be unlined as it looks like a linen sheer.  I love the color mix of the three fabrics.
Here's a picture of the entire treatment.  Although it's a little dark you get the idea.

Monday, March 9, 2015

100 Windows - #84

Here's one for you do-it-yourselfers! You only need basic sewing skills and you might even be able to figure this out without sewing a stitch!
I like the curved hem of this but you could easily make it pointed, like a pennant. And you could add trim, and I would love you for that!
Don't you adore that gorgeous aqua color? You can see that most of the charm of this design is in  using two different patterns.  You could also use two different colors or a solid and a print.
I would probably have interlined this valance to keep the patterns from showing through from the other side.
It works equally as well in multiples.
This is a great style for a window like this that has a lot of trim that you don't want to hide. The other plus? Very little yardage used. Perfect for when you fall in love with that million dollar fabric!
You do realize by now that each valance is just one piece of contrast lined fabric draped over a rod?

Monday, March 2, 2015

100 Windows - #82

Today I am showing you two different windows, but the same idea is used in each.
In the first valance, the same flat shape is repeated over and over. Notice how the pattern was matched on each piece.  Sometimes that uses more fabric, but it is more pleasing to the eye to see that kind of repetition.

The center piece of this valance is similar in shape to the "petals" above. The sides are wider and more elongated.  And of course, the big difference here is the trim. The pattern was not repeated exactly on the large pieces.
In either case, the entire design is made up of flat pieces, stapled to a board. Once you get past the math portion (!) these are very easy to cut and sew and a perfect start for a beginner.

Friday, December 5, 2014

100 Windows - #68

Now that it is getting colder, I'm already craving the return to warmer weather that is still so far off.
Here's a window treatment to help tide me over.
You get the beach theme by the starfish used as a holdback.  What is more difficult to see is that there are small seashells hand sewn all over this sheer.  I don't know if the drapery panel came this way or if it is a ready-made panel that some DIY'er got ahold of, but I love the idea.  Imagine what small items you could attach to a panel.

Wednesday, October 22, 2014

100 Windows - #62

Here is a creative idea, and perfect if you have multiple windows lined up and you want the repetition. Or if you have limited yardage of your fabric.
This treatment could be a "no-sew" treatment if you are handy with iron on adhesives and a glue gun. The striped layer underneath looks like it curves up a little at the bottom.  The "swag" part was actually flat so you would just create a pattern for that.  Surely the fringe was glued on! The whole thing could be stapled to a small board for installation or even mounted on a tension rod if you are able to install it inside the window frame.

Tuesday, October 7, 2014

100 Windows - #58

Here are a couple of fun ideas.
First, take a look at this cornice board with it's cutout.  A plaque that says "Relax" was fit into the opening. There are so many things you could put in that little opening.  Think of it as a shadowbox for display.  It would even be interesting if you put a contrasting fabric inside, or changed the size or shape of the opening.
Next, the grass skirt used as a valance completes the beachy theme. I have also seen this type of grass used as a bedskirt.  You just cut it to your correct length.  In case you can't tell, this valance and curtain are over a tub in a bathroom.

Wednesday, October 1, 2014

100 Windows - #55

I wish the colors in this treatment I saw in a model home were flashier so you could see the detail.  It's simple:  about 4" down from the pleated edge, trim was added horizontally across the top.  Although the easiest way to do this would be BEFORE the drapery was pleated, I suppose if you were very patient and really good with your adhesives, you could add the trim after the fact.
I've run a contrast band right through the middle of some pinch pleats (see below), but this I have yet to try.


Monday, September 29, 2014

100 Windows - #54

Did you know that some window treatments can be mounted directly to the window frame?
These valances are made in three pieces; two swags and a center banner valance, all stapled to the outside edge of the window frame. This was in another model home, so that is probably why they chose to mount it that way - less holes in the wall, less hardware - but it is hard to make the sides look finished if you are doing it yourself.
The three holdbacks at the top of each arch are purely decorative.
Love the contrast banding! Love the tassel!

Monday, June 16, 2014

100 Windows - #44

I realize this picture is difficult to see but it is so worth a look.
The 3 windows were surrounding a large tub in a master bathroom. This is one long piece of embroidered sheer fabric, hemmed at each end.  The hardware was just holdbacks mounted on the upper corners of each window and also at the top of the curve of the center window.  That was the easy part.
Working over a tub is never simple, and in fact, at times it feels downright death-defying. The ledge at the back of the tub is never quite as wide as my foot so moving back and forth to get everything even is less like walking a balance beam and more like performing on the tightrope!
Still, the design turned out light and airy and nicely finished the windows with their café shutters.

Monday, June 9, 2014

100 Windows - #41

Here is a valance I am not wild about.
Now, I have done something very similar, so I don't think it is the style. It is a good style to combine 2 different fabrics, and it also doesn't use much yardage. If you wanted to hide a blind up underneath it, this would be a good valance.
I almost think it is that solid piece of red in the center. I'd probably like it better if they had used the same fabric as the gathered side pieces. It also could be that in this photo, anyway, the colors in the valance don't relate to the color of the tile.
If you have a flat valance or cornice that you'd like to change, you can see how easy it would be to add the side pieces.
My favorite version of this valance is when the center flat section is curved upward at the hemline.

Tuesday, May 20, 2014

100 Windows - #37

A brief lesson in using materials in new ways. Here, the cord cleats, usually intended to wrap loose cords or strings, are put to use as brackets to support the curtain. And instead of fabric tabs, or ribbons, rope is used in this casual treatment. 
At first glance the theme of the room appears nautical, but upon closer inspection all the details are used to great effect for the favorite fisherman in your life!
And yes, that is a hanging bed!


Friday, April 25, 2014

100 Windows - #33

This will look a little bit like yesterday's post.  From a distance, this valance looks similar in shape and size and I just realized, this too is in a laundry room!
I had this tab valance made for my friend, who shall go unnamed because her husband installed it. I don't want people to know who he is because he installed it wrong! It's not terrible, but it's just a little incorrect.  And since they live 7 hours away, I couldn't help him.(If you spot the error, raise your hand!)
This fabric was so cute.  It was little blue and white toile-ish buttons on a yellow background. The tabs were blue and white check.  The labor of love, which I would only do for a good friend, was that I cut out the individual buttons and made covered buttons of them, that were then sewn onto the tabs. And you thought it was a simple valance!
My stylish friend completed the look by hanging those blue and white plates above the window.
Perfect! 

Thursday, March 6, 2014

100 Windows - #24

Here's an idea for a corner window using the most whimsical fabric!
It's a fun idea if you want to incorporate two different fabrics.  If you are a good seamstress you could even attach the top ruffle, the header, to a ready made panel to customize it.